Build a wooden desk with drawers using detailed designs
Building Your Dream Wooden Desk: A Step-by-Step Guide
Hey there, fellow DIY enthusiasts! So, you're dreaming of a beautiful, custom-built wooden desk? Fantastic! Let's dive into building one together. This isn't going to be some quick, five-minute project, but with a bit of patience and these detailed instructions, you’ll be sitting proudly behind your handiwork in no time. We'll be building a desk with drawers â€" because who doesn't love extra storage?Materials You'll Need
Before we even think about grabbing a saw, let's gather our supplies. Remember, these are suggestions, and you can always adjust based on your desired size and style. For a desk approximately 48" wide x 24" deep x 30" high (but hey, make it your own!), you'll likely need:- Wood: I recommend using solid hardwood like oak, maple, or cherry for a durable and beautiful finish. You'll need boards for the desktop, legs, drawer sides, drawer fronts, drawer bottoms, and supports. Roughly:
- Two 48" x 24" boards for the desktop (you can join two boards if necessary)
- Four 28" legs (can be tapered or square, your choice!)
- Two 18" x 6" boards for each drawer side (adjust for the number of drawers you want)
- Boards for drawer fronts (matching drawer side height)
- Thin plywood or MDF for drawer bottoms
- Support boards for the drawers and the desktop frame
- Wood Glue: A good quality wood glue is essential for strong joints.
- Wood Screws (various sizes): For securing the frame and drawer parts. You'll want some longer screws for the legs and shorter ones for the drawers.
- Dowels (optional): For added strength in joints, especially for the drawers.
- Pocket Hole Jig (optional but recommended): Makes creating strong, hidden joints a breeze.
- Sandpaper (various grits): From coarse to fine, for smoothing the wood.
- Wood Finish (your choice!): Stain, paint, varnish, etc. Get creative!
- Drawer Slides: Make your life easier by using pre-made drawer slides. Undermount slides are a clean and stylish option.
- Hardware (knobs, handles): Pick something that matches your style.
- Safety Gear: Safety glasses, dust mask, and hearing protection â€" always prioritize your safety!
Building the Desk Frame
Cutting the Wood
First things first â€" get your measurements precise! Using your chosen dimensions, cut all your wood pieces to size. A miter saw is ideal for clean cuts, but a hand saw will work if that's what you have. Remember to account for any joinery techniques you're planning to use (like pocket holes or mortise and tenon joints). Don't rush this step; accurate cuts are key to a sturdy desk.
Assembling the Frame
Now comes the fun part! There are several ways to assemble the desk frame, but I find a simple frame construction with pocket holes to be efficient and strong. Drill pocket holes into the ends of the support boards (the boards that will make up the bottom frame connecting the legs). Then attach the support boards to the legs using wood glue and screws. Ensure your frame is square using a square to check the corners!
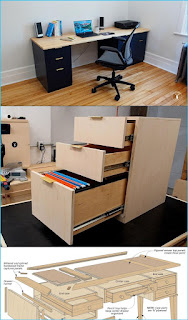
Building the Drawers
Cutting the Drawer Pieces
Measure and cut the pieces for your drawers. You'll need two sides, a front, a back, and a bottom for each drawer. Again, a miter saw is a helpful tool for precise cuts. If using dowels for extra strength, drill pilot holes for them before assembling.
Assembling the Drawers
Apply wood glue to the joints of your drawer sides, front, and back. Use clamps to hold everything together while the glue dries. Once the glue is set, attach the drawer bottom (plywood or MDF) using wood glue and small nails or brads. If you've used dowels, be careful not to split the wood when driving them in!
Installing Drawer Slides
Follow the instructions provided with your drawer slides. Most will involve attaching one part to the drawer sides and the other to the desk frame. Ensure the slides are level and aligned properly for smooth drawer operation.
Attaching the Drawer Fronts
Once the drawer slides are installed, attach the drawer fronts to the drawer boxes using wood glue and screws. You can use countersinking bits for a cleaner look. Now is a good time to make sure your drawer movements are smooth.
Attaching the Desktop
This step depends on the overall design you've chosen for your desk. You might attach the desktop directly on top of the frame or use additional supports. You can add cleats (small supports) to the front and back of the frame, adding a strong base for the desktop and helping with weight distribution. Again, wood glue and screws are your friends here. Apply wood glue to the contact surfaces and secure with screws. Carefully position the desktop to ensure it's level and centered.
Finishing Touches
Time for the fun part! Sand all surfaces thoroughly, starting with coarser grits and progressing to finer ones. This will create a smooth surface for your finish. Apply your chosen finish â€" stain, paint, or varnish â€" following the manufacturer's instructions. Allow sufficient drying time between coats. Once the finish is dry, attach your chosen hardware (knobs or pulls) to the drawers.
Frequently Asked Questions (FAQ)
Q: What type of wood is best for a desk?
A: Hardwoods like oak, maple, cherry, or walnut are excellent choices for their durability and beauty. Softwoods like pine are cheaper but less durable.
Q: How do I ensure my desk is square?
A: Use a framing square to check the corners of your frame during assembly. Adjust as needed to ensure all angles are 90 degrees.
Q: What kind of finish should I use?
A: The best finish depends on your personal preference and the wood you're using. Oil-based finishes provide a more durable, water-resistant layer, while water-based finishes are easier to clean up.
Q: Can I add more drawers?
A: Absolutely! Just adjust the measurements accordingly and follow the same process for each additional drawer.
Q: What if I don't have all the tools mentioned?
A: Many of these tools can be rented from tool rental stores. Don’t be discouraged if you don't have a full workshop at home to start with.
And there you have it! With a little elbow grease and these instructions, you'll soon be the proud owner of a handcrafted wooden desk. Remember to take your time, enjoy the process, and don't be afraid to personalize it to your liking. Happy building!


Comments
Post a Comment